
The warmer weather is just around the corner folks! I can tell because my crocus have bloomed and I’m cold weather sewing-ed out.
As the weather warms, we sewists start to think about sewing items we want to make meant for warmer months ahead.
Maybe for you, that means, a different type of shoulder bag or scrunchies to put your hair up. Maybe it means shorts for your kids or grandkids. Or maybe…
Dresses
When I think of warm weather clothing, my mind automatically jumps to dresses. Sleeveless knee length sundresses are so comfortable. They are definitely my go-to on hot days.
Dresses are easy to put on, comfortable, and you only have to match your shoes! You don’t have to worry if your shirt color is matching your pants color, or if that flowy top put with the loose pants makes you look frumpy. You just throw on your dress and hit the day!
So why not try a sundress sewing pattern?
This post contains affiliate links. The cost of any items listed are the same cost for you, but it sends a few pennies my way to help buy fabric and keep the blog running.
Blog Tour
By the way, this blog post is part of the Spring Blog Hop hosted by Sew Much Charm. If you aren’t familiar with the phrase, “blog hop,” that just means that a group of bloggers are blogging on a theme. This one being, spring and summer clothes!
Here’s a little information about the Blog Hop and who’s part of it!:
Welcome to the Spring Fling Blog Hop!
Be sure to check each day by 6AM (Central Standard Time)! Each day there will be a blogger (or more) doing a giveaway! So be sure to check each blog post & just comment on their blog post from this blog hop and you are entered to win!
Monday – Sew Much Charm & Vlogger Sewing From Scratch
Tuesday – TPtheModestDoll22 & That’s Sew Venice
Wednesday – SewGr8ful & Sequoia Lynn Sews
Thursday – Let’s Go Hobby! & The Sarcastic Sewist
Friday – The Bear & the Pea Atelier & Wildflowers & Whimsey
Stay tuned to the end for the Let’s Go Hobby Giveaway! (ENDED)
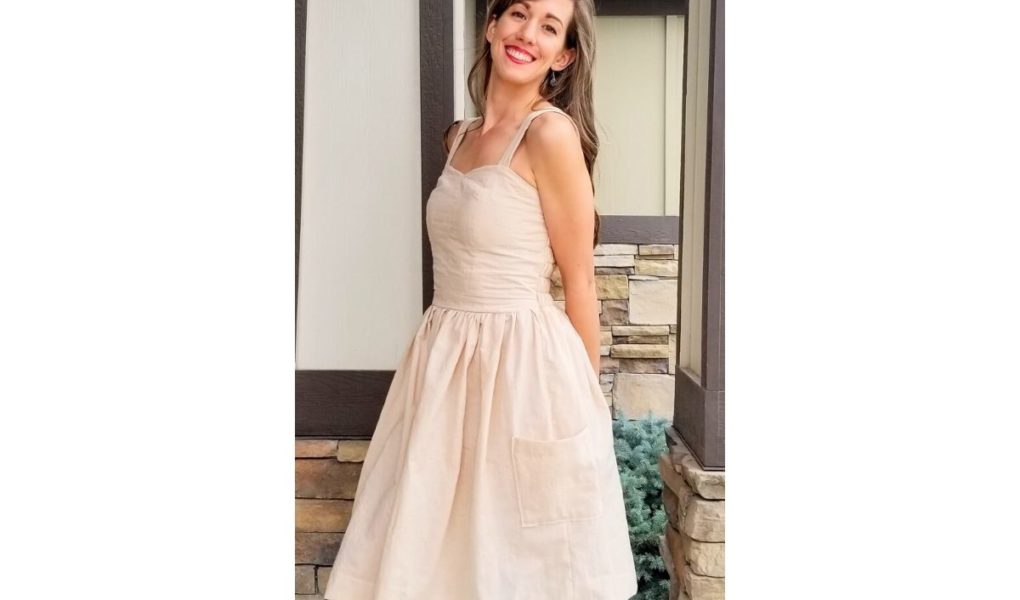
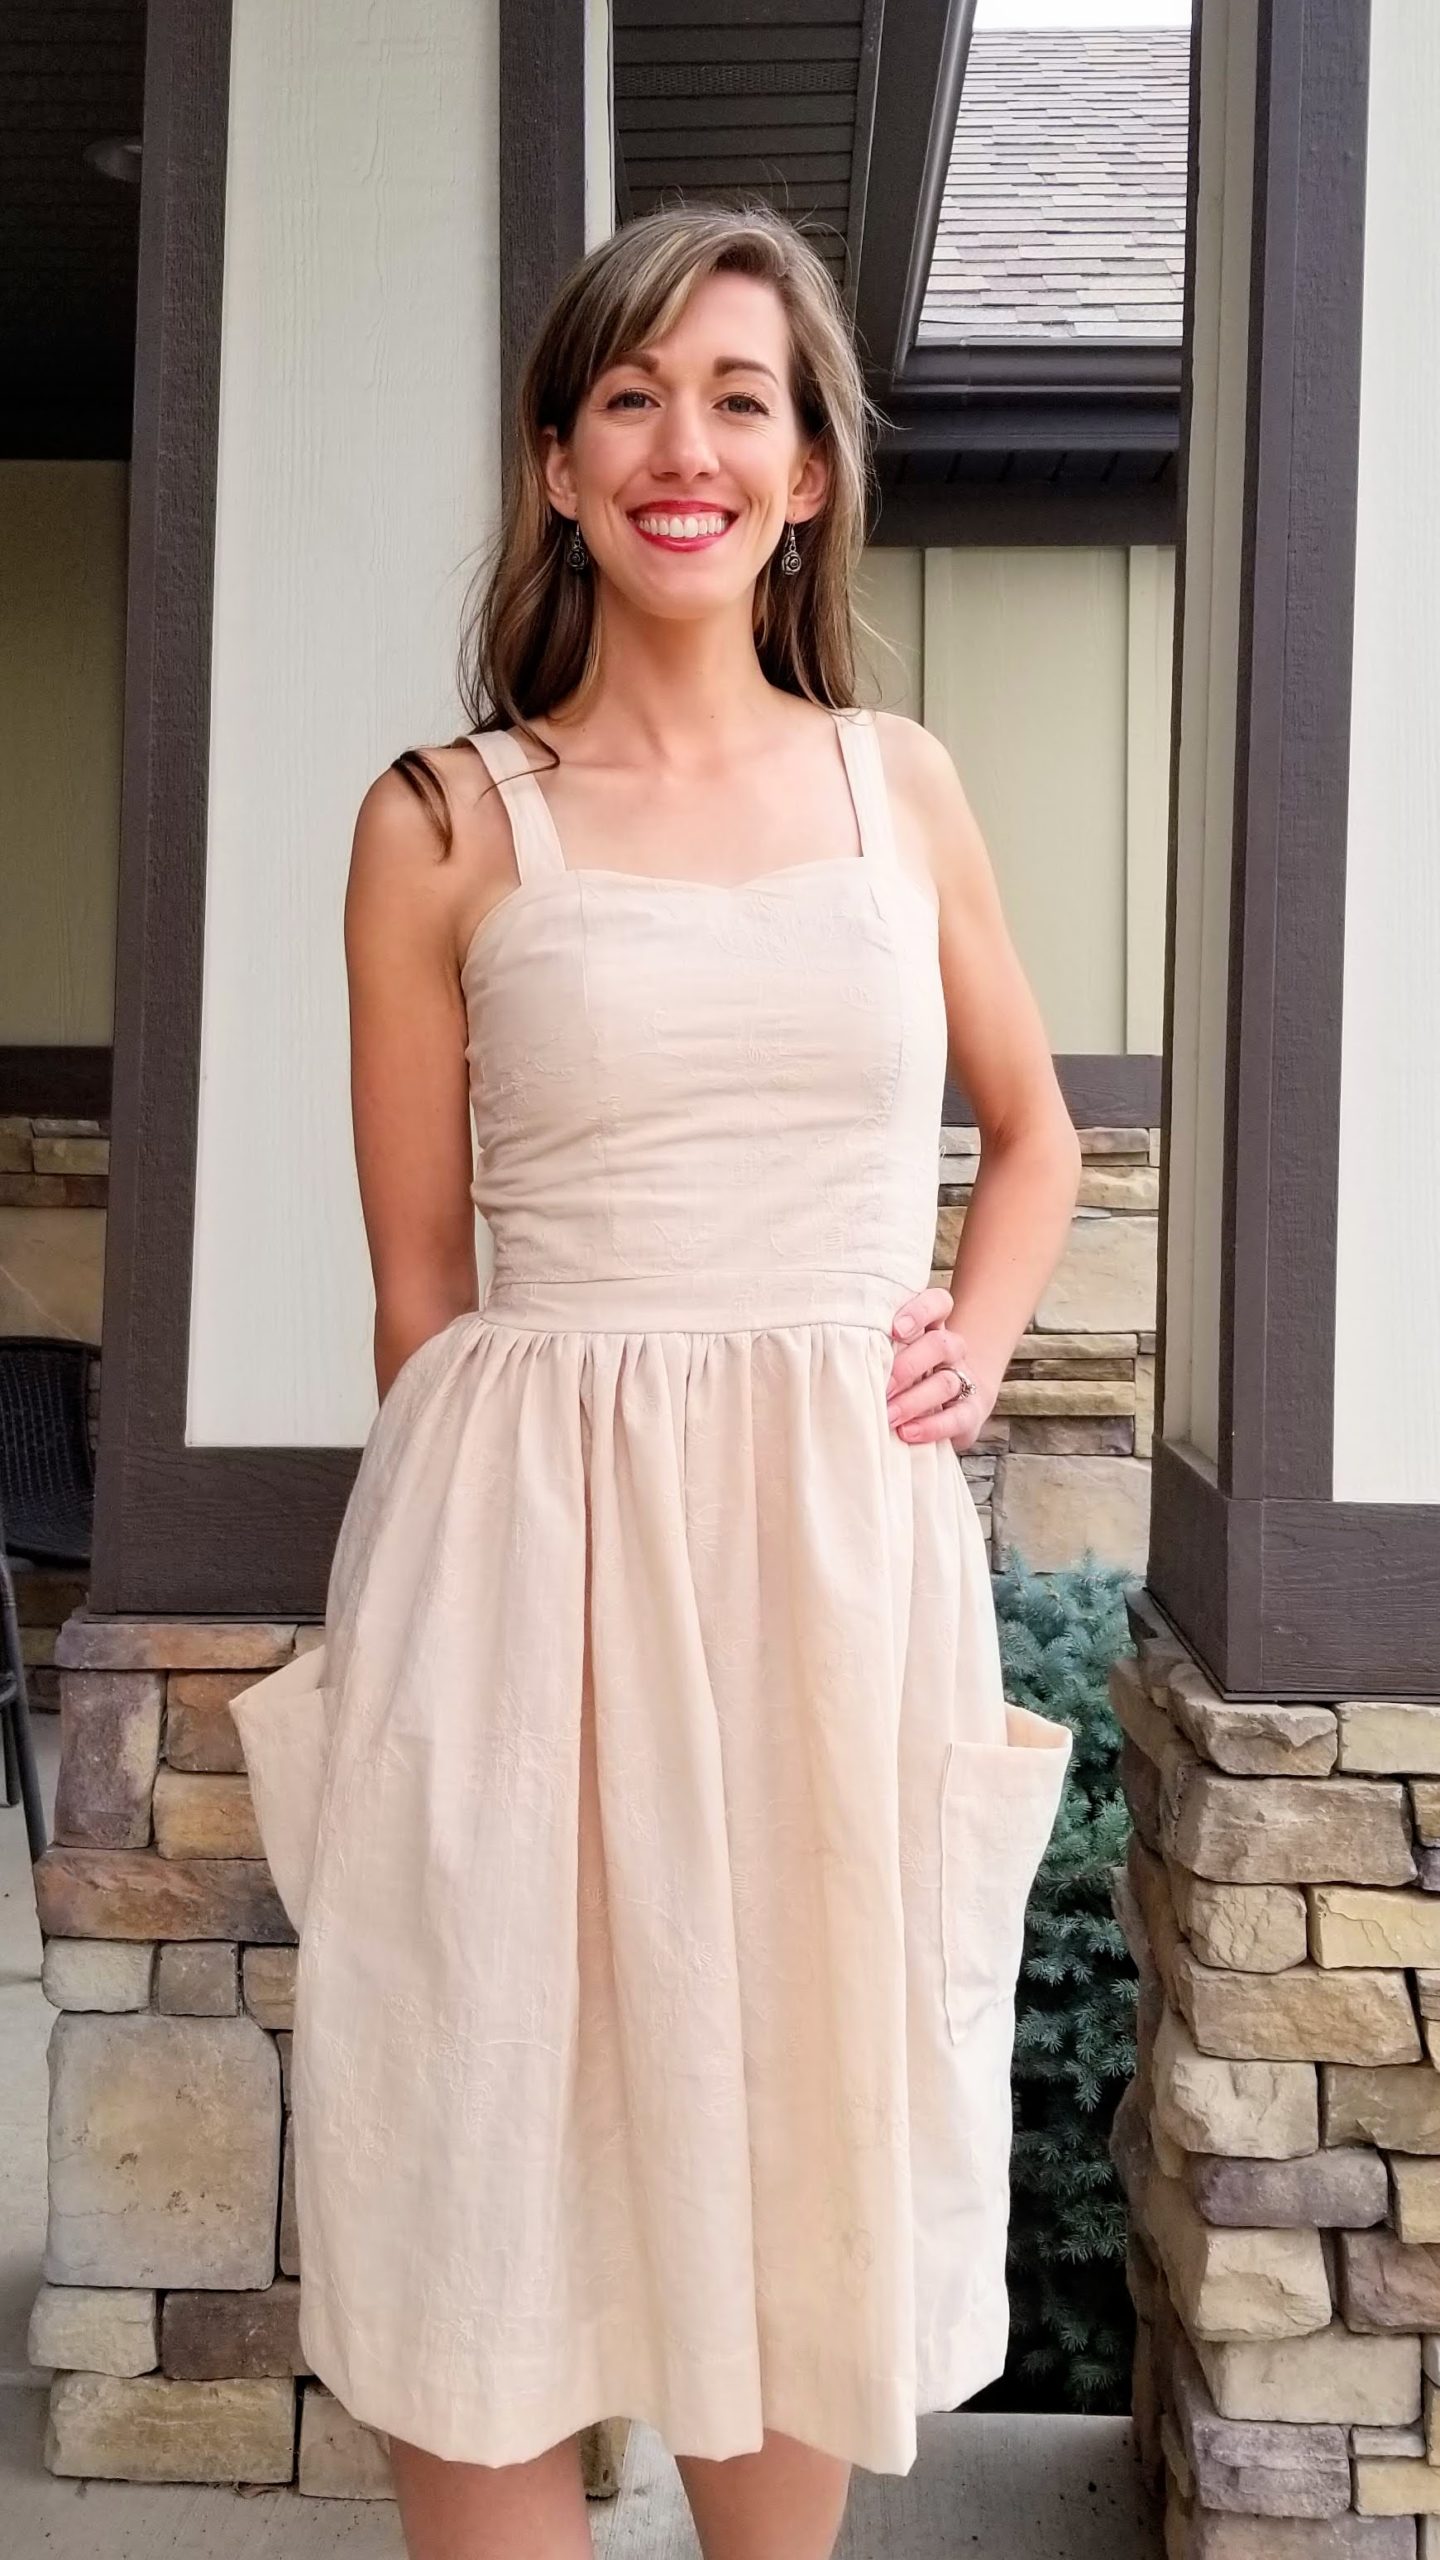
Sundress Pattern
For this blog hop, I chose to make the Patterns for Pirates So Classic Sundress. It really is just soooo classic! It almost looks like a vintage sundress pattern right?

Truly, I’ve been drooling over, and wanting to make this dress, since it released in August, 2018 – a year and a half ago! I bought it and downloaded the PDF pattern file in September of 2018.
So why didn’t I make the dress until now? I was intimidated! There are a ton of options for this dress. Every time I opened the pattern file, I would look at all the options and not know what to make. Plus, I’m not as experienced with woven clothing patterns, so I was worried about my sewing skills.
Since the pattern released, I’ve gotten more experience with making woven patterns like the Rebecca Page Madison Blouse and the Seen and Sewn Aspen Tank which I also blogged about!
So, I purposefully chose the So Classic Sundress for this blog tour, not only because it’s a really cute and classic warm weather pattern, but also to push me to finally make this dress I’ve been wanting to tackle for so long!

So Classic Sundress Pattern Options
The So Classic Sundress pattern from Patterns for Pirates is packed with options. I’ll try to list them for you succinctly below:
Skirt Lengths
- Mini
- Knee
- Maxi
Skirt Styles
- Plain Front
- Button Up Front with Placket
Straps
- Regular
- Halter (tie in the back)
Bodice Length
- Empire Waist (waistband just below the bust)
- Natural Waist (waistband hits at where your torso bends)
Bodice Styles (all lined)
- No Center Seam
- Plain Center Seam
- Button Up Center with Placket
- Bucket Patch Pockets (at side seam, and the pockets intentionally “bucket” out.)
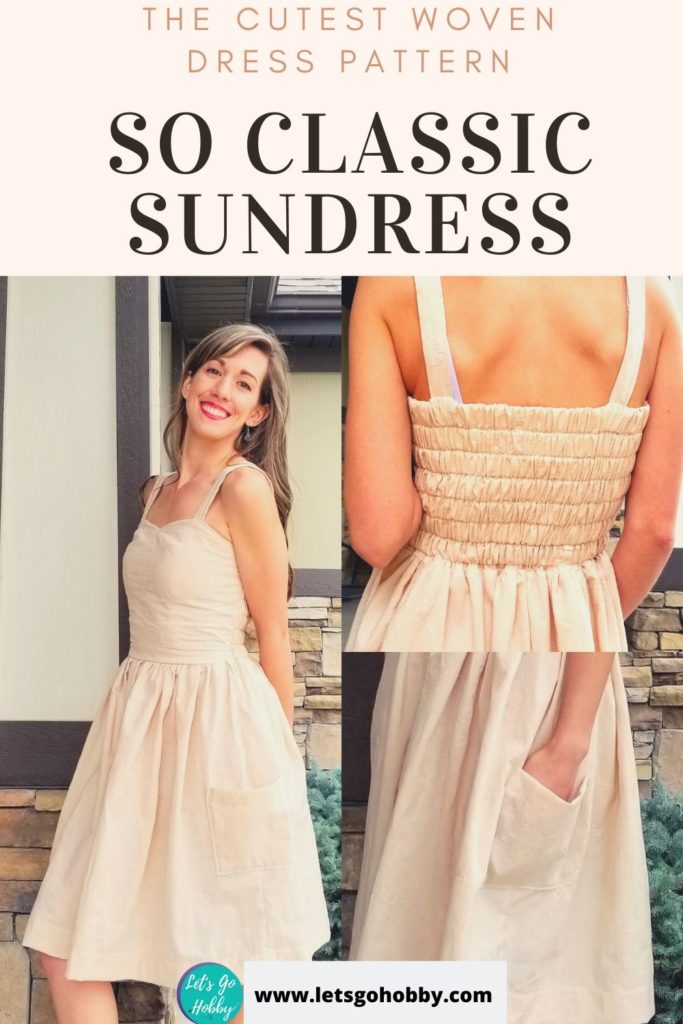
The Best Part
Now, for the best part of the dress in my opinion. The back! I’ve been saving this beauty for you. I think you will love it…

What you are looking at is 7 rows of 1 inch elastic encased in the back of the bodice. What does that mean?
No Zippers! And really, no buttons needed.
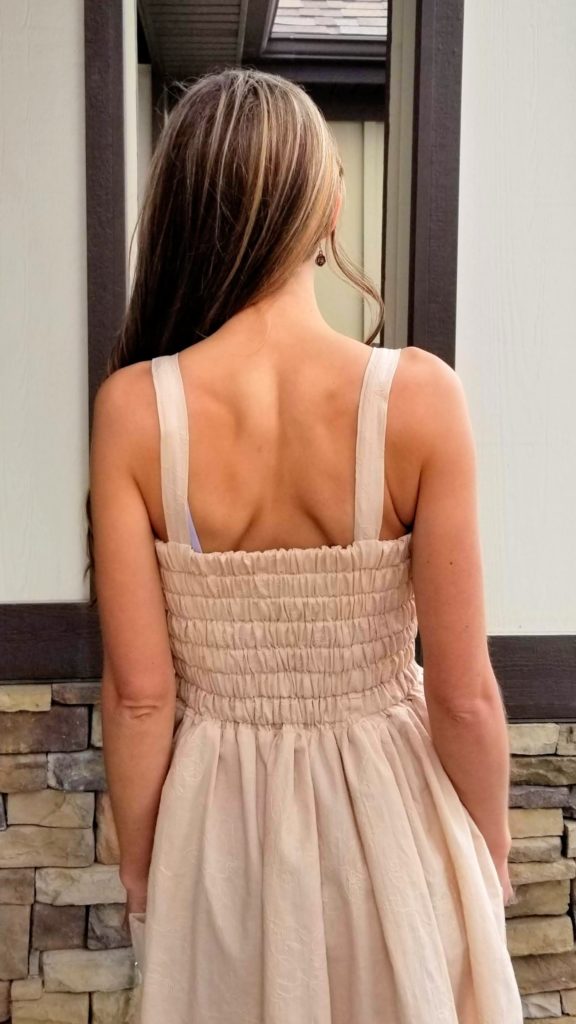
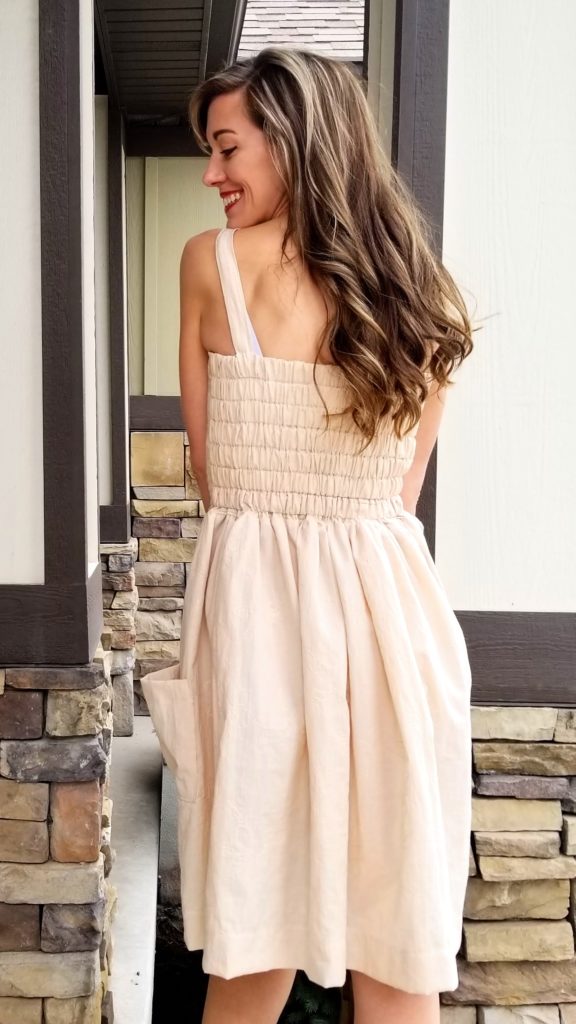
With all that elastic, you can slip this baby over your head or from the legs up provided your bust or hips measurement isn’t greatly larger than your waist. I’ve got 11 inches difference between my waist and hips, and this sundress slipped right on anyway!
My Dress
Like I mentioned before, this pattern has sooo many options. It can be hard to decide which version you want to make. I finally decided after looking through the tester photos on the listing and also searching for the name of the pattern in the Patterns for Pirates Facebook Group.
From both of those sources, I got a better idea of what I liked and what options I wanted to make for my first try.
For this dress make, here are the options I chose:
- Knee Length Plain Skirt
- Regular Straps
- Natural Waist
- No Center Seam Bodice
- Plus Pockets!

I planned to wear this garment in the late Spring and Summer when the weather gets nice and toasty, so I wanted a knee length skirt to keep me cool. I’m not real into mini skirts while tromping around with my kids, so knee length was definitely the right choice for me.
I wanted a classic look, so I chose the regular straps this time. I do think the halter straps are cute too. And if you check out the dress hacks on the P4P website blog HERE, you can see some fun strap hacks like criss-crossing the regular straps or widening them.
A little tip on the strap placement:
The instructions tell you to put the straps at the princess seams. I actually plopped the front bodice on the front of my shirt and placed the straps at the princess seams. Then realized that the dress straps would not cover my bra straps at that spot. So I moved the straps out a bit to ensure coverage.
I went with the natural waist height for the waistband because that’s generally what looks best on my pear shaped body. It emphasizes the narrowest part of the waist!
There’s no center seam or plackets on this make, because I wanted to start simple for the first version to make sure it fit well before I took all the time to add buttons and button holes! By the way, if you do decide to make the button up version, you can check out my How To Sew Buttons Tutorial Blog Post if you’d like.
Fabric
This dress is drafted for woven fabric. I do have a small stash of woven fabrics in my sea of knits. So, for this make, I used an floral embroidered cotton fabric I picked up on clearance from Knitpop (one of my favorite online fabric stores). I think it was like $2.00/yd, no joke! I ordered 4 yards each of two different colors. So, it’s a cotton sundress!

Come to think of it, I also used this same fabric for the skirt of my first Clover Dress, which is a George and Ginger pattern. You can see that make on my sewing Instagram profile HERE.
Fit Adjustments
I didn’t have to do too many adjustments for this pattern. I did lengthen the bodice by 1.5 inches as I have a longer torso. P4P drafts for an 8 inch side waist, and mine is around 9.5″. I’m only 5’5″, which is around what a lot of pattern designers draft for, so don’t assume your measurements without checking!
The photo below is not for this dress, it’s actually for the George and Ginger Clover Dress (blog post here), but I have to do this on any bodice that has a waist seam.
To lengthen the bodice, I just chop all the bodice pieces at the same point and add a scrap piece of paper at the length I need added in between the to parts. Then tape it all pack together and smooth the sides with my scissors.

Because of the extra bodice length, I did have to add an additional casing for another row of elastic in the back of the bodice on the So Classic Sundress. The pattern instructions have a link to a video on how to make the casing lines and some tips too!
After watching that helpful video, I decided to make each elastic casing 1.25″ To draw each line I used tailors chalk, my self healing mat, and two rulers to ensure I got straight lines all the way across before sewing the casings through the back bodice piece.

Bust Adjustment
So, when I first measured myself and compared my measurements to the pattern sizing, I realized that I fit into one size everywhere except in the bust.
My bust measurement was one size smaller than everywhere else. I know from experience that this smaller size is not because my back all the way around the front is small, but that I just need a small bust adjustment when this happens.
But how do you do a small bust adjustment (or SBA) with princess seams? Very Carefully… just kidding. So what I did was – cut out the size I fit everywhere else in, including at the bust. I considered just grading in at the princess seams, but I wanted to make sure the bodice fit well, especially since it’s woven!
Then after constructing the front bodice lining, I held it up to my bust to see how much I needed to take in.

If you do this, be sure to pull the bodice tightly at the sides so that you are mimicking the 1/2 inch seam allowance between front and back bodice pieces.
I then basted the princess seam curves at 1/4″ just through the bust curve to start with. I took a bit more in on both sides and a little at the very top of the bodice while making sure to grade out to nothing at the bottom of the bodice where I still needed the extra fabric. I then repeated the curve I came up with on the main bodice piece.
Just out of curiosity, after comparing the smaller size at the princess seam with my adjustment, it turns out, that line was pretty darn close to how much I took the seam in. Go figure!
Wrap Up
Well, I hoped you enjoyed this stop on the Spring Fling Blog Hop 2020. In these crazy times in the world, let us allow our hobbies to bring us joy!
Where to Find the Sundress Pattern?
If you are interested in making this sewing pattern, or even just seeing it on all the lovely testers, be sure to check it out on the Patterns for Pirates website by clicking HERE!
It’s a lovely dress perfect for warm spring days and it makes for a perfect summer dress pattern too!
One Last Bonus
Giveaway time!!
I’m giving away a $10 gift card to one lucky winner. All you have to do is comment below on this post. I want to hear about your favorite spring and summer patterns!
This giveaway is in no way affiliated with Patterns for Pirates. I just want to give you all the opportunity to make something cute too! The winner will be announced on this Saturday, the 28th. So be sure to comment by midnight EST on Friday 3/27/20.
GIVEAWAY CLOSED! Thanks to all who entered!!
Be sure to also check out the other bloggers in the Spring Fling Blog Tour as many are running their own giveaways too! Click HERE to take you back up to the other blogger links.
Social Media!
And if you want to follow me on social media, you can check out my sewing instagram HERE.
Or on Facebook, my page is located HERE.
Thanks for stopping by!
What a gorgeous summer dress Jessica. I picked this dress pattern up over the holidays with hopes of making one this spring/summer. I love the choices you chose with no buttons in the front…..that looked a little daunting for a beginner like me. I also love the back, that’s what actually sold me on the dress in the first place. I made my daughter a Halloween dress that had a similar back and loved the look. I have a beautiful purple eyelet I think would make a great So Classic Sundress. Thank you for all the tips and ideas. I’ll be sure to come back when I start.
Yes, it’s good to start simple! After you get the sewing and fit down, you can add buttons to a dress down the line! And purple eyelet with this patterns sounds amazing!
[…] – Let’s Go Hobby! & The Sarcastic […]
Lovely dress, I’ve been hording fabric to make this. But I can’t decide which option I want to make. Empire or natural waist ? I think I need also a FBA so that makes it not easier. But looking at youres I think maybe I will go with natural waist.
Oh both waist lengths are so cute! But I do usually choose natural waist to emphasize that part of the body. There are some great FBA tutorials around. Rebecca Page has a few tutorials you can download for free. I believe there was a free FBA one for the Phoebe dress on their site.
Thanks, im sure to check them out.. ♡
This turned out adorable
Thank you!
Your dress is so pretty but yet so versatile for everyday in the summer! You’ve inspired me to make one!
Thanks! And yes, make one!
What a super cute make! I never would have known you weren’t confident in sewing with wovens from those photos… it turned out beautifully! I think I may need to pick up this pattern for the trip we’re planning to Hawaii this October (assuming the COVID-19 stuff is under control by then…). Thanks for sharing your experience with this beautiful pattern.
Thank you! I’m sure my inexperience just translates into longer sew times! But, definitely worth it I think! Hope we all get back to normal by then 🙂
Love the cool look and great fit you achieved! I’m going to have to check out that pattern,
It’s a good one!
You look like the quintessential summer lady should look! I’ve been eyeing this pattern for awhile – you just convinced me to get it! 🙂
Thanks! I’m so excited to wear it as the weather allows! 🙂
I love the sundress ! The back is
awesome !!! It’s the perfect old fashion sundress and yes easy to put on and take off !!! It looks very comfortable !
Thank you! It’s so comfy!
I love the sundress! It’s such a classic summer look. The back has such a youthful look . It reminds me of what I wore many years ago. To make it and wear it at my older age now would give me a youthful mindset . Thank you for sharing ! Sheila FinnertyCell
You’re never to old to look and feel good in your clothes!
I love the fact that you moved the straps to cover your bra straps! That’s something that I would not have thought about until, likely too late! That’s a great tip that you shared! Thank you for being in the Spring Fling Blog Hop!
Thanks Sarah! 🙂
[…] – Let’s Go Hobby! & The Sarcastic […]
[…] & That’s Sew Venice Wednesday – SewGr8ful & Sequoia Lynn Sews Thursday – Let’s Go Hobby! & The Sarcastic Sewist Friday – The Bear & the Pea Atelier & Wildflowers & […]
Love your sun dress. One of my favorite summer dresses is the Jordan by sister company Made for Mermaids.
Thanks! I’ll have to look that one up!
So beautiful!! I love your fabric choice.
Oh thank you!
This dress is so pretty! You look super cute! I’m still looking for the perfect summer/spring dress… there are so many options to check out 😉
Thanks! Yes, so many pretty patterns out there for us to enjoy!
Love the sundress looks so comfy!! love the elastic back!
Thanks, it is! The back is probably my favorite part.
I just found your blog through the PDF Pattern Promotions Facebook page and can’t wait to explore your makes! What a lovely job you did sewing all the elastic casings!
Oh fun! And thank you!
I love the fabric you chose for this dress! Definitely spring-y!
Thanks!
[…] – Let’s Go Hobby! & The Sarcastic […]
Hey all! Thank you for commenting, it was fun to hear your thoughts!
There were 14 unique comments (minus mine and Sarah’s who hosted the blog hop!). I ran 1 through 14 through random number generator and it gave me #2 which is Els.
Congratulations Els! I will email the gift card over.
Thank you all for participating in the giveaway!
[…] by new and complicated patterns or sewing with different types of fabrics. When I made the P4P So Classic Sundress (blog post too!), I had been sitting on that pattern for almost 2 years before I got the confidence […]