
Table of Contents
Get Comfortable Sewing with Knit Fabrics
Today I want to give you a few beginner sewing pattern ideas to try that will help you get comfortable with sewing knit fabrics. If you sew all 3 of these, you’ll have a cute outfit. But you could certainly just sew one or two if you like the patterns.
The sewing patterns below are PDF patterns from Ellie and Mac. There are a few reasons that I chose Ellie and Mac for these beginner sewing patterns.
- The great thing about Ellie and Mac Patterns is that they are affordable. If you’re on a tight budget you can follow the weekly $3.50 sales which change over each Wednesday with six new patterns (but even the full price is a great deal). You can really get a lot of sewing patterns for your money!
- All Ellie and Mac Patterns include detailed instructions and a video tutorial that walks you through each step. Perfect for beginners!
Need some help with PDF Sewing Patterns? Start by clicking HERE which will take you to my Comprehensive Post called PDF Sewing Patterns 101 which will explain what a PDF pattern is, how to use it, how to print it, and more!
Beginner Sewing Patterns for Knit Fabrics
There are a ton of beginner sewing patterns to choose from at E&M, but I decided to go with these three because they are all extra beginner friendly, come together fast, and combined – they make a cute outfit.
One is a free sewing pattern and the other two are not. The clothing patterns are for drafted adults using the Ellie and Mac curvy fit size chart (designed for a women’s body) which generally goes from XXS-6XL or 7XL.
Here are the beginner sewing pattern picks:
- Hair Scrunchie Pattern – This is the free pattern! It’s a super quick sew and uses very little fabric and just a bit of elastic. If you accidentally cut or sew it wrong, no harm no foul. Just try again!
- Oversized Tee Pattern – As it’s name suggests, this one is a loose fitting shirt pattern. It has lots of options, but it’s easy to assemble. It also will fit even if you don’t know exactly which knit fabric to choose. It can be hemmed or banded. Bands are nice so that you don’t need to hem which is a skill to learn as a beginner sewist.
- Not So Basic Pants Pattern – This pants pattern is actually very simple without the ruffles which is an extra option. If you have a bit of sewing experience already, you could add the ruffled hem which requires gathering. If you’re brand new to sewing, I would recommend waiting until a future pair and stick to the basic wide legged capri or full length pant first.
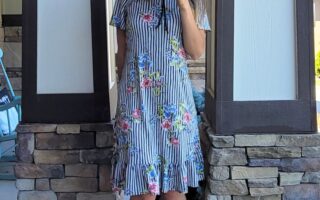
Want to see all three of these patterns put together?

Sewing Patterns Options
Scrunchie Pattern

I made the Ellie and Mac Hair Scrunchie as is. This is a super simple sewing pattern and only has one length option. You can use knit (stretchy) or woven fabric it. I chose to use the same fabric as my shirt fabric which is knit (it’s double brushed polyester fabric).
Oversized Tee Pattern

The Ellie and Mac Oversized Tee Pattern has LOTS of options, which is great. You can make a number of different looks from just one pattern. Here’s the line drawing from the pattern listing:

I made the Banded Boatneck with Short Drop Sleeves (hemmed) and the Hemmed Short Crop length with the Band for the Banded Short Crop. It sounds complicated here, but when you see the pattern it becomes very clear. More on that later.
I used Double Brushed Polyester fabric (which you’ll see as DBP or Double Brushed Poly as well). It’s buttery soft, has great stretch, is easy to work with, and affordable. It doesn’t breathe the best so can wear hot, but I still like it! It also dries really fast, so if you use it, be sure to get it out of the washing machine and into the dryer fast so that it doesn’t get a funky smell.
Not So Basic Pants Pattern

The Not So Basic Pants have a few options. As I mentioned earlier, the pants without the ruffle option will be the easiest to sew. The ruffle is fun though. It would also make super cute pajamas with the ruffle in a fun accent color. Here’s the line drawing from the pattern listing:

I made the version you see on the far right in the drawing above, the “Wide Leg No Ruffle Variation.” It’s literally 2 pant legs and a waistband. If you’ve made leggings before, these are no different except their width. They are fitted through the waist and hips and then become wider as they go down the leg.
You do have to be a bit more choosy on which fabric you choose for these. If you pick a fabric with only 2-way stretch, they will not be long enough and won’t fit well. You want the fabric to stretch both horizontally (perpendicular to the selvage) and vertically (parallel to the selvage edge).
(Wondering what selvage is? The selvage is the border that runs along the length of the fabric edges, it usually has tiny holes in it or an obvious border).
I chose a ribbed stretch polyester corduroy for my pants. It has great horizonal stretch and just enough vertical stretch. I did make another pair last week in a fabric with more stretch both ways in the same size and they have a slightly different look and feel. So fabric choice here does matter.
Fabric options include:
- Double Brushed Polyester (DBP)
- ITY (Interlock Twist Yarn)
- Cotton Spandex
- Athletic Knits (Nylon Spandex, Polyester Spandex)
- Some French Terry’s (check for 4-way stretch, some only have 2)
Here’s the other fabric for comparison:

Fabric Cutting Tips
Which Way to Cut Fabric
With knit fabric, you always want the stretchy part of the fabric to go around your body horizontally, so if you’re cutting a pattern piece, you can imagine the stretch going across the pattern pieces the same way. How do you know which way is the correct way if your fabric stretches both horizontally and vertically?
The easiest way to know is to find the selvage on the borders of your fabric. The selvage will have tiny pinhole marks along it or be a different colored border from the rest of the fabric. The stretch runs perpendicular to the selvage. This is called the crossgrain or crosswise.

You’ll also notice if you look very closely, that the thicker lines where the fabric is woven will stretch apart from one another when it’s stretched perpendicular to the selvage similar to how an accordion unfolds.
How to Cut Mirrored Pattern Pieces
You can cut mirrored pieces one of two ways:
- Fold the fabric over itself crosswise and cut both layers of fabric under the pattern piece
- Or cut the pattern piece with it facing up, then again in a different part of the fabric facing down
I chose option 1. below for the Not So Basic Pants. If you want to save fabric OR if your pattern piece doesn’t fit on the fabric while it’s folded, then you will use option 2.
*(You will probably have a paper pattern, what you see below is my projected pattern)

How to Cut on the Fold
When you cut on the fold, you want to fold your fabric over just enough to fit your pattern piece. If you fold the fabric so that one selvage is touching the other selvage, you’ll end up with a big hole in the middle of your fabric and then you might not be able to fit the rest of the pattern pieces with the fabric you have left.
Check out the picture below to see what I mean. Here I’m cutting out the sleeves for the Oversized Tee Pattern. I’ve folded the fabric over itself crosswise just enough to fit my pattern piece in that space. I aligned the “Cut On Fold” marking with the fold of my fabric.
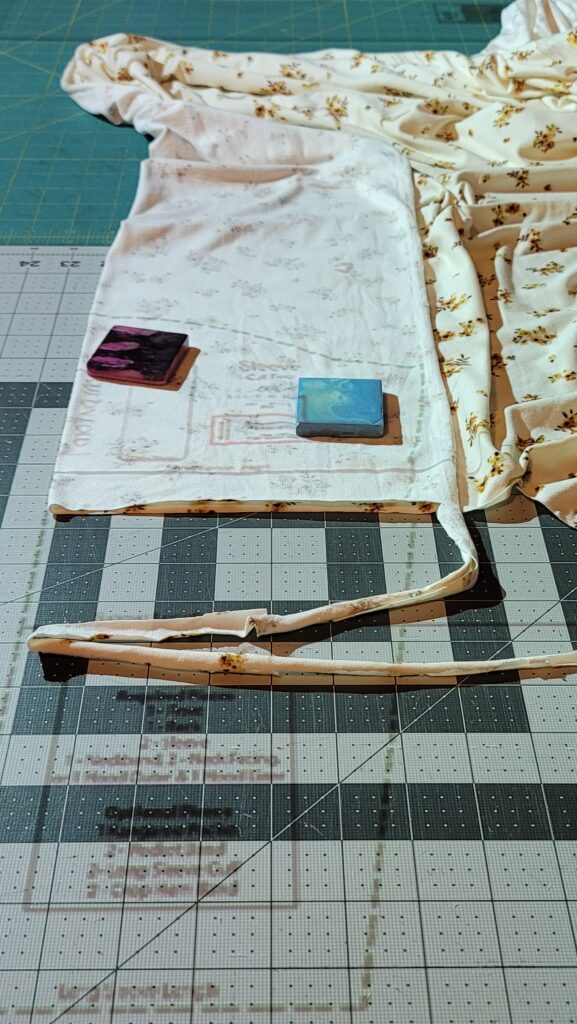
What Are Those Squares on the Fabric?
If you’re wondering what they are, continue reading! Those are pattern weights. You can use pattern weights to hold your fabric down. Other options are pinning your pattern piece to your fabric (not my favorite but some people love it). Or you can put a metal sheet underneath your cutting mat and use magnets to hold the fabric in place.
Tips for Sewing the Oversized Tee
There are back, crewneck, and boatneck neckline cut lines on the bodice piece. For boatneck version, like I made, you just cut both the front and back bodices on the boatneck line which is the widest one.
The sleeves I used are just the short sleeves and I hemmed them. If you make the long sleeved version, you don’t have to hem as it has a cuff.
For the length, I don’t like my shirts too short, but I wanted it to be a big cropped. So I cut the shirt length on the “cropped hem” line. BUT, here’s where I deviated. Instead of hemming, I added the cropped band to this length.

You get a pop of midriff with this length, but that’s it. If you prefer a shorter length, go with the cropped banded look. Like a longer shirt? Cut on that line. The world is your oyster.
I hope that this blog helped you gain some knowledge so that you can become more confident with knit fabric and sewing patterns for knit.
Where to Find these Beginner Sewing Patterns
Here are the links to the sewing patterns I used so that you can check them out and maybe sew them too!
If You Sew It
If you make this outfit, I’d LOVE to see it. Tag me!
You can find me on Instagram at www.instagram.com/sewletsgohobby
On Facebook at www.facebook.com/letsgohobby
Thanks for reading and hope to catch you again soon!
I’ve included affiliate links in this post. It doesn’t cost you any extra, but it helps me buy fabric so I can sew more things to write about!
Previous Sewing Blog Posts
Here’s a list of the other posts I’ve written for the Ellie and Mac Blog, tap any title to see those posts –
- Make a Gardening Tote (with a free pattern)
- Going Home Sweater to Cardigan Hack
- Be Invincible & Urban Leggings Mash
- Exploring the Feel Pretty Pants
- Hack Your Wrapped Love Dress
- Be Dreamy Dress Hack
- Morning Lounge Wear
- Sunset Dreams Dress to Top Hack
- Be Smart Jumper Hack
- Add a Paperbag Waist to Any Skirt