


The Designer Stitch Madison Dress! This is beautiful and very well drafted dress sewing pattern meant for Ponte (de Roma) or similar double knits.
While I do love the pattern, I will start with a warning that this pattern is NOT for beginners. There are a few tricky parts that make this good for intermediate sewists. And if you are looking for a challenge, this dress might be for you!
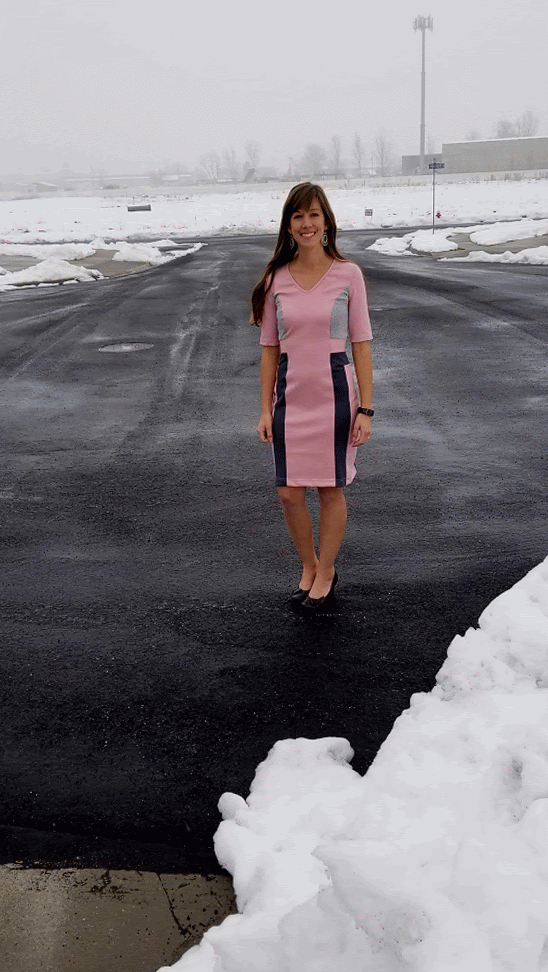
Madison Dress Pattern Options!

Color Blocking
Of course, you can color block it however you choose, but the 1, 2, 3 color blocking I used is per the standard recommendation in the PDF pattern. There is a chart included in the PDF that shows exactly where to put the main fabric and 2 coordinating fabrics. Neat huh?
With that said, you could certainly do just 2 colors, 1 color, or switch around where you put the colors. That’s the fun and creative part about designing what you sew up!
Skirt Styles
I made the the fitted skirt style, which is a pencil skirt shape. There is also a half circle skirt dress option with a color blocking line down the center front as you can see above. My skirt is the 21 3/4″ lengths which comes just above my knees.
Sleeves
Sleeve options are:
- sleeveless, with banded armscyes
- half sleeves (just above the elbow like mine is)
- full length sleeves

All About Ponte
Ponte (aka ponte de roma) is a lovely fabric, especially if you can get your hands on the quality kind. Did you see the article from the most recent Threads Magazine issue about Ponte (March 2020)?

It talks about the material percentages to ensure that you get a Ponte Knit that is not like the stuff from the “1970s leisure suits” that has undesired qualities like poor recovery and a tendency to pill.
The article stated that the best Ponte is one which has a high rayon content, nylon (since polyester pills!), and a smaller stitch gauge (which can be inferred from fabric recovery characteristics – if it stretches out and makes a permanent mark when you push your thumb into the fabric = not good recovery.). So if you can find Ponte with these characteristics, you are good to go!
However, I will say that while Ponte does have good qualities, like stability and the ability to smooth over untoned places of the body…it also shows fit flaws very apparently.
This is where making a dress like this becomes slightly more challenging. In a looser fabric, sometimes the wrinkles are less noticeable or can even add to the look of a garment. But in a fitted dress like this, and in a structured fabric, the wrinkles are not so great.
Pattern Testing
I tested this pattern for the pattern maker – Designer Stitch. So, I started by making a muslin (or a toile as Ann of Designer Stitch calls the first draft of a garment).
I didn’t have enough Ponte on hand, and so ended up making my toile mainly using a stretch denim. Unfortunately, I learned that the characteristics of stretch denim are very different from that of Ponte.
The stretch denim is a looser and more relaxed fabric and so other than seeing that I needed to add 1/2″ in length to the bodice of the dress since I have a longer than average torso, the toile didn’t really help!
Ignore my messy hair! Below is a fit photo for the toile. You can probably see that the top of the green color blocking is hitting above my natural waist. It should be right at the natural waist.

So I ended up adding a half inch of length through all the panels just below the bust line (that includes the center front, center back, and 2 side panel pieces).
You may also be able to see that the dress is loose all over, but there is especially some loose fabric at my lower back (more on that below!)
So, after acquiring more Ponte at Joann Fabric Store, I made another toile. This is anti-pill Ponte found near the athletic fabrics at my local Joann’s.
It was much more apparent in this remake about what needed to be done for fit. Look at the picture below and maybe you can find a few things that need fixing.

Ok, so to start with, I missed the instruction where the CB (center back) seam should be sewn at 5/8″ instead of the standard 1/4″ for the pattern.
But, beyond that you can see all the excess fabric at my low back is accentuated in the Ponte. It does not look good. Whereas with the stretch denim, you could see the extra fabric there, but it didn’t really look bad and wrinkled like this.
Another problem you might notice with the picture above is the wrinkle lines through the back sides at the bodice. And those lines resonate through the sleeves. It’s just a bit too big for me there.
I also want to point out that before adding the sleeves, those wrinkle lines were not there! It’s super important for your toile to have all the pattern pieces you want to have for your final garment. Below is the picture without sleeves. Look! No wrinkles!

Sway Back Adjustment
The excess fabric at the lower back in my toile called for a sway back adjustment (Here’s the sway back adjustment tutorial from Ann of Designer Stitch). I made a large dart across the back, but misunderstood as it was my first time making this adjustment, and put it in the wrong place!
This placement of the dart changes the lines of the color blocking in the dress – as you can see below. It did help the fabric in that area smooth out, but made the ‘L’ color block shorter in the back.

So I removed that stitching and redid the dart above the square waist panels. (make sure to baste any adjustments first!)

Keep in mind that when making alterations, you should always do only one change at a time! If you look closely at the picture above, taking the excess fabric from the mid back took some of the lines out from beneath the arms.
…when making alterations, you should always do only one change at a time!

From here, I took in the side seams a bit between the waist and hip and also along the side seams from the bust to bicep.
At this point, my final was okayed by the designer, and so I seam ripped the back two center panels out of the dress, and cut two new ones with the wedge from the sway back adjustment removed.
Other Obstacles
Along the way I encountered a few other obstacles with this dress. Originally I had planned on using a white fabric for the L shaped color blocked panels, and then had to remove the two I had inserted after realizing that they were see through!
I also struggled a bit with making the 90 degree turn on L’s, as the fabric there will become puckered if they aren’t done right.
And lastly, matching up the color blocking along the side seams was difficult, and I ended up basting those areas with the sewing machine before using the serger to finish those seams.
I’d never done a v-neck neckline in the way that this pattern has you do it. For this v-neck, the neckband seam line is aligned with the shoulder seam and the v is made with a small stitch at the center front. I misunderstood and put the seam in the front like I’ve seen v-necks constructed in the past. The v-neck construction method in the pattern is probably taken out of factory construction techniques, as the designer, Ann, is fond of them.
Summed up, me and my seam ripper became very friendly during this time!
But, I am proud of myself for persisting and finishing the garment. I learned a lot about fit and about how to alter a dress for my specific body. I also learned more about fabrics and even some new sewing techniques.
If you are a more experienced sewist, I’m sure you will sew this dress pattern up with no problems. If you are a confident beginner or intermediate sewist, this will be a fun challenge for you I’m sure!
You can see the rest of the beautiful tester dresses on the Designer Stitch website HERE.
And, If you love Designer Stitch Drafting, you can see my Designer Stitch Allie Wrap Skirt HERE.
As always, feel free to ask questions or leave comments below.

