
This is a brief overview of what Projector Sewing is all about.
Projector Sewing is based off using PDF Patterns. If you missed my other comprehensive post about PDF Sewing Patterns, you can find them by clicking the link below:
See below for the Projector Sewing 101 Course Outline:
Table of Contents
Projector Sewing
If you haven’t heard of sewing with projectors, here’s the run down:
Sewists (me included) are now projecting their patterns directly onto fabric and cutting out the lines of the sewing pattern pieces without any paper involved.
No printing, no taping, no cutting – just straight from the computer to the fabric. It’s amazing.
The type of pattern used is generally a PDF (not sure what a PDF is? Find out HERE) version of a pattern with size layers so that only the size(s) needed are cast onto a cutting mat.
Many Indie pattern companies are now making a separate Projector File specially formatted to make this type of sewing easier. These files include large font, wide margins, and thick cutting lines. However, even older PDF patterns or even pictures of vintage patterns can be used if it’s possible to calibrate the projection to ensure that one is cutting the correct sized lines and shapes.
You might be thinking, what kind of projector? Like a movie projector? Maybe! All types of projectors are being used for sewing. Maybe not the huge kind you see in a movie theater, but definitely all the types you see for home, classroom, and conference room uses.
Types of Projectors
There are 4 main types of projectors that work well for projecting to cut fabric:
- Pico
- Mini
- Short Throw
- Ultra Short Throw
Each type of projector can cast it’s projection from a different distance and angle which makes them each useful in their own ways for different rooms and sewing set ups.
Pico and Mini Projectors
I’m going to group these two types of projector together since they are both small and have similar qualities.
There are some Pico and Mini projectors that allow you to mount them to the ceiling (or hang from a tripod) and still get a decent throw (size of projection) onto a table with normal 8 foot ceilings. However, most Pico and Mini projectors require either a taller ceiling, or for the sewist to cut on the floor, in order to have a large enough throw to be useful for pattern cutting.
However, if you have 12 foot ceilings or don’t mind cutting on the floor, these types are very affordable, light, and easy to mount and calibrate. I’ll talk more about calibration later.
Mini and Pico projectors can be found at places like Amazon and electronic stores like Best Buy. The Mini type are usually more affordable and can be bought for under $100.
Short Throw Projectors
Short Throw Projectors are neat, you can hang them on the wall about 4-5 feet above a table and it gives you a very large throw (area of projection).
Once mounted on the wall, they are stable and generally don’t need to be re-calibrated.
The downside to Short Throw Projectors is that they are heavy which makes them harder to mount and they tend to be the most expensive out of all the projector types.
Ultra Short Throw Projectors
This is the type of projector I have.
Ultra Short Throw Projectors are unique in that they can be set right on a table or the floor and the projection is cast directly in down front of the machine onto the same table or floor.
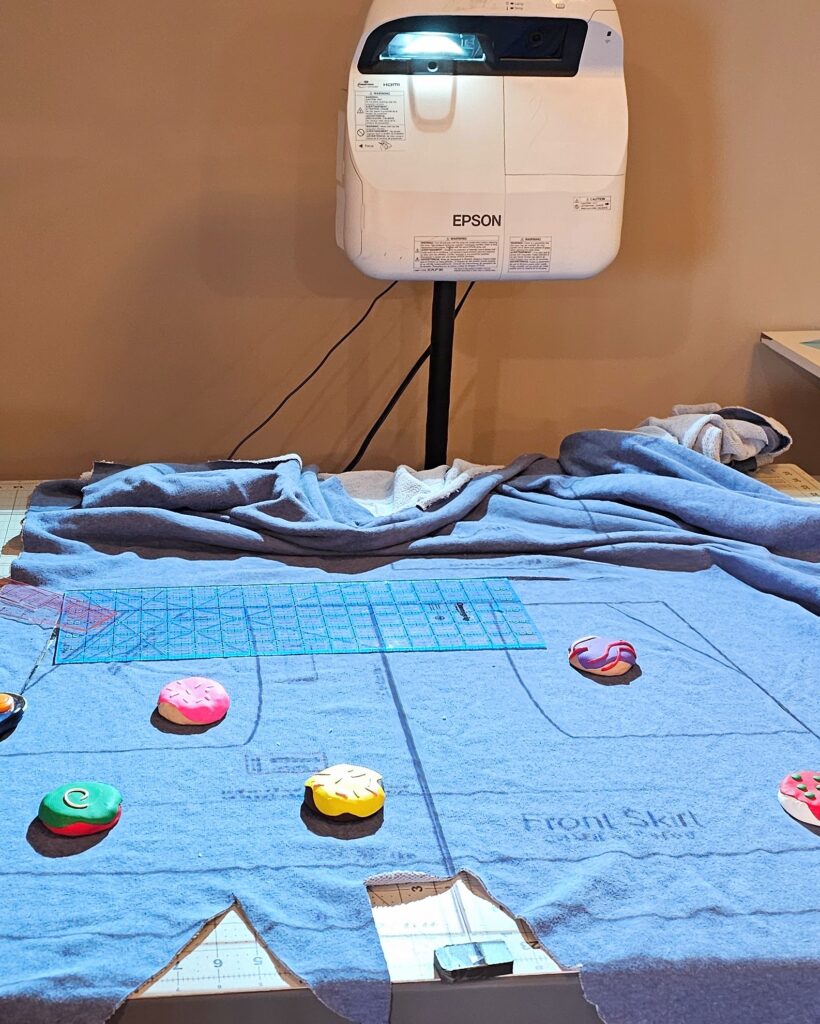
These are the types of projectors you see in conference rooms and classrooms that are usually mounted on the wall just above or below the projection area. With sewing, we just prop them upright to use.
While they can be put directly on a cutting table, most people put them on a shelf or mount them to a tv stand or wall 4 to 12 inches above the cutting surface so that the throw (area of projection) is much larger.
Most people are not buying Ultra Short Throw Projectors new. They are bought second hand after being used in classrooms or conference rooms. I bought mine off ebay for around $180.
With this set up, I have two large self healing cutting mats with a total cutting area of over 36″ x 36″. I LOVE it. It saves so much time and paper.
How do you Calibrate a Projector?
You might be wondering how you ensure that the pattern is the same size on your cutting mat as the original pattern. That’s a very good question!
The basic way to calibrate a projector is a simple concept, but sometimes harder to realize depending on some factors.
Essentially, it’s best to start with:
- A Projector that is level
- A table or floor that is level
- A standard 18*36″ Cutting Mat (although any large size mat will work)
- Adobe Reader (This is a free program, you can find it HERE)
The idea is that you mount or place your projector in a certain spot with everything level. You pull up a pattern or calibration document in Adobe Reader on your computer.
Next, you place a cutting mat underneath the projection and change the zoom percentage until it matches the size of the calibration document or gridlines from a Projector Pattern File.
It can be a bit harder if you don’t have everything level because you either need to shim your table or maybe change your projector keystone settings. A lot more information about all of this can be found in an amazing group on Facebook called “Projectors for Sewing”. You can find that group by clicking HERE.
Once you have everything calibrated correctly, it’s just a simple matter of bringing a PDF Sewing Pattern File up on your Computer and projecting it to your table where it will be ready to use for cutting your fabric!
There are a few people in the Projector Sewing world that have gone above and beyond to help everyone. They started a group on Facebook that is very informative, and have put together a number of very useful guides.
Here is the link to the Calibration Guide. It is so incredibly useful – Projector Sewing Setup and Calibration Guide
Software Programs for Projector Sewing
In the last years, a few extremely helpful computer programs have been developed to make the whole process easier. Read on to find out more about them.
PDF Stitcher
PDF Stitcher is free software program that is used to reformat digital sewing pattern files to be usable (or better) for use with Projector Sewing.
Like I said, it’s completely free and you can find the download on their website.
At the time of writing it is an open source software made by a sewist who is also a programmer.
PDF Stitcher:
- Allows you to tile pattern files that are usually meant for printing on a home printer. It collates all the pages into one big format so that it can be projected and cut out.
- Has the capability to add larger margins around the sewing pattern pieces so that the pieces can be moved around to fit onto the cutting area below a projector.
- Can change the size (thickness) and color of the pattern piece outlines or strokes so that they are more visible on the fabric.
I’m extremely grateful to the maker of this software as it has made cutting certain patterns a whole lot easier or even possible at all.
Some pattern designers are making much better projector files than others. The less quality projector files can be “fixed” with PDF Stitcher (at least in the category of being a nice projector file to work with!).
Pattern Projector
This new open source software that allows you to calibrate to any sized mat. It also allows you do “stitch” a pattern together that was originally meant for printing on multiple pages, and it does it right on the screen. It has a few other really neat adds that make cutting even easier.
Here’s the video from the creator to see all it can do:
The nice thing about Pattern Projector is that it’s free! Here’s the link to their website so you can grab it yourself and try it – Pattern Projector Website
Project and Cut
This is a newer software program on the scenes. The idea is that it allows you to calibrate your projector very easily and quickly. Here’s the intro video from the developer:
It has a free trial period and then costs $20. I haven’t used it myself, but if you are struggling to calibrate, it may be worth it!
It looks like it has a few more cool options within the software that allow you to quickly invert colors and manipulate the pieces within the file. All of this can be done without the program as well though. If you use it and love it, I’d love to hear about your experience in the comments!
Projector Sewing Patterns
Not all companies have projector sewing pattern files. Of course, if you read through the programs above, all patterns can made into a format that will project.
However, if you just want to be able to buy a pattern and easily project it without any modifications there are some companies that do a better job with the files than others.
Here are a few PDF pattern companies that put out great projector files:
There are others that have good projector files, but not great ones. These files need to be pulled through PDF Stitcher (header above for information) in order for me to use them. But, it’s only that one step and they are ready to go:
- Copper Creek Patterns (Formerly DIBY Club)
- Patterns for Pirates (P4P)
- Made for Mermaids (M4M)
- Styla Patterns
Wondering what makes a great projector file?
- Thick lines so they can easily be seen on all fabrics.
- Wide margins so that the pattern pieces can be moved around to any spot on a cutting mat.
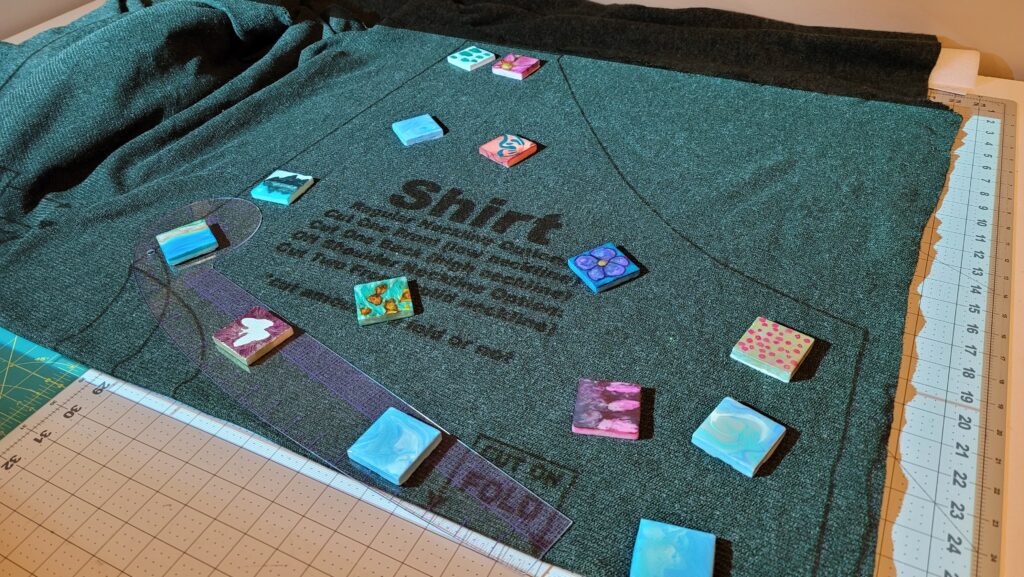
- Large font so that the words can be seen and read on the projection.
- Unfolded pattern pieces so that it’s simple to cut thick fabrics (thicker fabrics can distort the projector lines when cut on a fold).
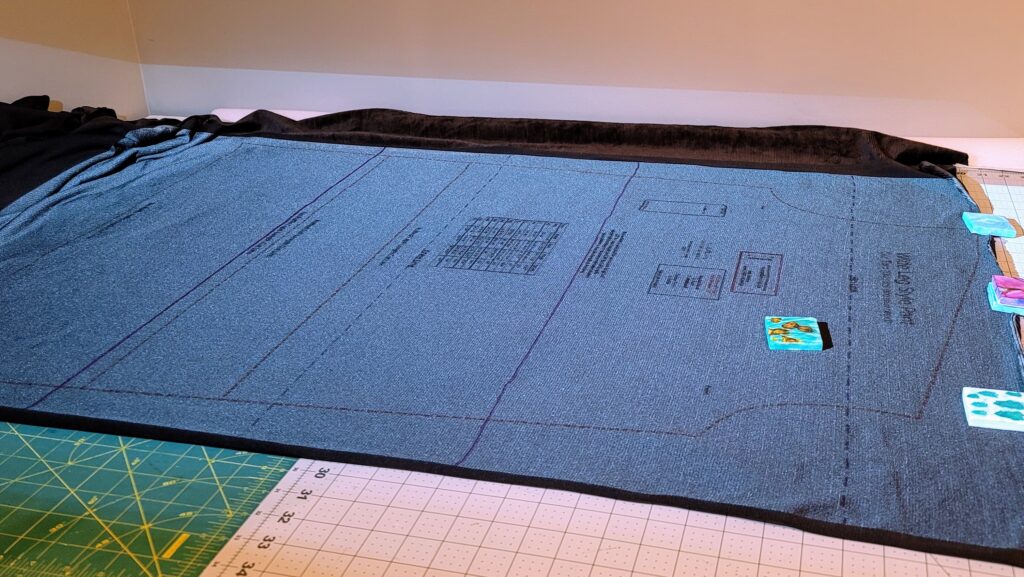
Here’s an example of a great projector file. This is the Ellie and Mac High Hopes Dolman Pattern. Check out that large font and easy to cut on lines!
Projector Sewing Questions
If you came into my blog wondering, “What is Projector Sewing?” I hope I have answered that question for you and given some good resources on where and how to get started.
If you have any questions, feel free to leave a comment below and I’ll answer to the best of my knowledge!
Happy Sewing!

[…] (Want to know more about Projector Sewing? – Tap to read my comprehensive beginners guide to – Sewing with Projectors). […]
[…] Want to know more? I have a whole separate post that deep dives into projector sewing – tap HERE. […]