This is the second comprehensive post in the series of about PDF Sewing Patterns. Want the introductory post about PDF Patterns for Beginners?
Find it by clicking here – PDF Sewing Patterns 101 – A Complete Step-by-Step Guide
In the first post of this series, I went over why PDF patterns are so great, where to find PDF sewing patterns, how to assemble print PDF patterns at home, and a few more ideas about how to store the cut out papers.
Here’s our “course content” for PDF Sewing Patterns 102:
Table of Contents
I’ll go through each subject here briefly, but if you’d like to know more about a certain subject, please leave your comment below and I’ll make a separate post about it!
By now you should already know quite a bit about where to find PDF patterns and how to use the paper version of them.
But, have you heard of the “new” technology on the block? The world of Projector Sewing?
Projector Sewing
If you haven’t heard of sewing with projectors, here’s the run down: People (me included) are now projecting their patterns directly onto fabric and cutting out the lines of the sewing pattern pieces without any paper involved.
No printing, no taping, no cutting – just straight from the computer to the fabric. It’s amazing.
The type of pattern used is generally a PDF version of a pattern with size layers so that only the size(s) needed are cast onto a cutting mat. Many Indie pattern companies are now making a separate Projector File specially formatted to make this type of sewing easier with large font, wide margins, and thick cutting lines. However, even older PDF patterns or even pictures of vintage patterns can be used if it’s possible to calibrate the projection to ensure that one is cutting the correct sized lines and shapes.
You might be thinking, what kind of projector? Like a movie projector? Maybe! All types of projectors are being used for sewing. Maybe not the huge kind you see in a movie theater, but definitely all the types you see for home, classroom, and conference room uses.
Want to know more? I have a whole separate post that deep dives into projector sewing – tap HERE.
Where to Print A0 Sized Patterns
If Projector Sewing sounds scary or just not for you, you might be wondering if there is another option besides printing and assembling.
You might be wondering if you can just have your PDF Sewing Patterns printed on big paper instead of having to print out all the papers, assemble them together, cut everything out every time.
There is a way! Most PDF pattern companies include a large format pattern file that is A0 sized. A0 just refers to the size of paper which is 33.1 inches x 46.8 inches. (A0 is also sometimes referred to as “Copy Shop” or “Copy Size”.)
Since most people who get this type of file printed only want to pay for it once per pattern, they will have all the size layers selected when printing and then use the large printed paper as a Master Copy that they trace each size they want off of.
Of course you don’t have to print all the layers. As long as layers are provided, you could just have 1 or 2 sizes layers printed off. That would be up to you!
While any shop with a an A0 sized printer can make these for you, you want to make sure they understand that the pattern NEEDS to be printed correctly to size. On every PDF pattern, there are size calibration boxes (they are generally 1 to 2 inches wide). The printer needs to ensure that the calibration boxes are correct or the whole pattern will be the wrong size.
The good printers will also fold the printed patterns (or roll them) well so that they can be easily handled and stored. This is a good topic to ask about before choosing a print shop.
The last thing you want to ask about is what type of paper they are printing it onto. I’ve used a few A0 sized patterns before and they were printed on paper that was a weight somewhere between regular home printer paper and cardstock. You don’t want it to be too flimsy because with the size of the patper, it would end up causing the paper to tear.
There are a few online places that you can order large scale copies of patterns from. In the US, PDF Plotter is well known, but there are a number of locations, just look up “Print A0 Sewing Patterns” on google with the location you need.
You can also look into Indie Stitch which a subscription box that you order and it comes with an already printed A0 sized pattern along with the fabric and notions needed for that pattern all in the box. It’s pretty neat, here’s the link to that (not an affiliate link) – Indie Stitch Monthly Sewing Kits.
How to Grade Between Sizes
Grading between sizes in a sewing pattern isn’t as hard as you might think! It’s also an extremely useful skill to have when making clothing as you will find the that your DIY clothes will fit much better.
Grading is simply drawing a line gradually from one size to another. A general rule of thumb is that you don’t want to grade between more than 2 sizes at a time. So you woudn’t want to go from say a size 4 directly to a size 8. But if you measured as a size 4 bust, 6 waist, and 8 hip – that would be no problem as you are just grading out one size in each area.
Let me show you with a few graphics:
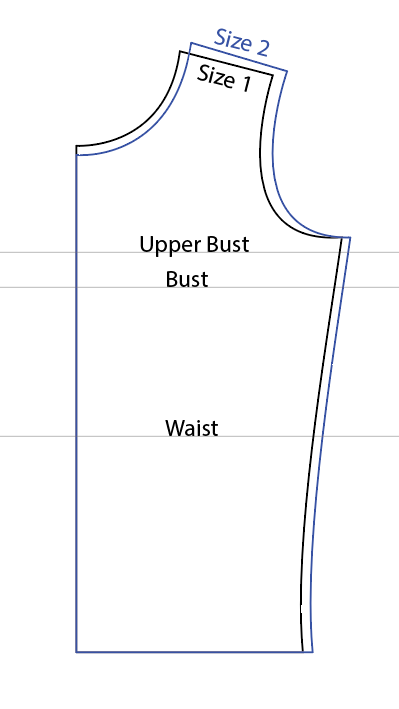
This first graphic shows two sizes of a bodice (that would be cut on a fold). Size 1 is the smaller size and Size 2 is the next larger size.

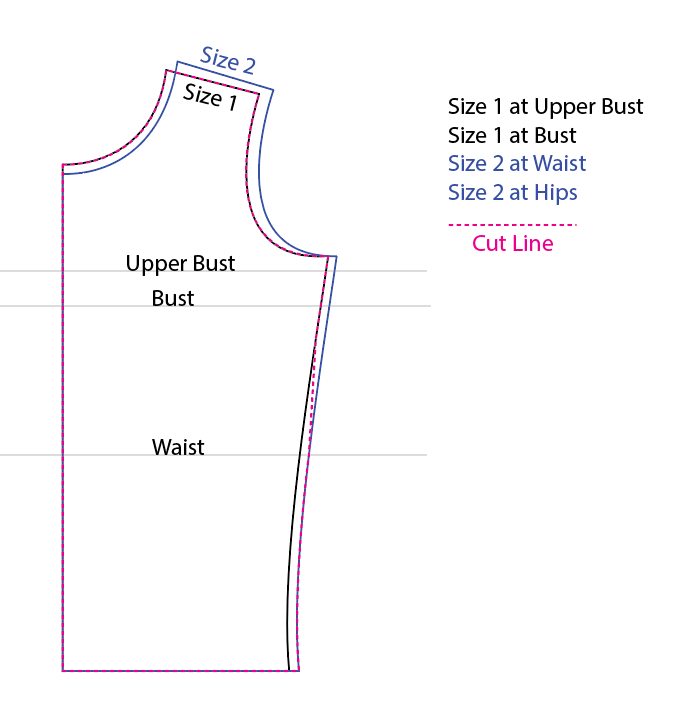
This next graphic shows how you would cut this pattern out if the information on the right was what you (or your model) measured as in the pattern company’s size chart. Most often you can pick your size by what your Upper Bust Measures into. In the case below, you would pick the size 2 for the neckline, shoulder, armscye and bust area. Just below the bust, you start creeping the line toward the smaller Size 1 touching it at the waist line. Then, slowly grade the line back out to to size 2 for the hips.

In the case below the Upper Bust fell into Size 1 in the size chart. So to cut, we follow size 1 through the neckline, shoulder, armscye, and bust. But then begin to grade out just a bit below the bustline so that you cut through the waistline area at size 2 and continue to follow that size 2 line down to the hem.

Questions about how to grade sewing patterns? You can ask them below or come over to my Instagram (www.instagram.com/sewletsgohobby) to ask me there which I probably would see sooner.
Where to Find Fabric Online
If you’re in the United States, you probably already know about Joann and Hobby Lobby and maybe some local stores in your area. But there are many online fabric stores, here are a few links to check of stores I’ve ordered from and enjoyed. Some have just knit fabrics and others have both knits and wovens of different qualities:
Where to Find Sewing Supplies
Besides your local fabric stores, there are a few places online that are great for picking up sewing tools, bag hardware, zippers, and other sewing notions and supplies:
Which PDF Pattern Companies Include Video Tutorials
Almost all major PDF pattern companies (ones that have their own website and a decent following) have good to great instructions. But not all have video tutorials to go along with their patterns.
Ellie and Mac Patterns has a video tutorial for every pattern that they release which is absolutely fabulous for beginners. But, even for more intermediate sewists, it’s nice to have a video to pop over to and look at if you get stuck and aren’t sure what a step in the instructions is talking about.
Below is a skirt I made using the Button A-Line Pattern from Ellie and Mac (Find that skirt by clicking HERE).

You can find Ellie and Mac Patterns HERE. And their video tutorials HERE.
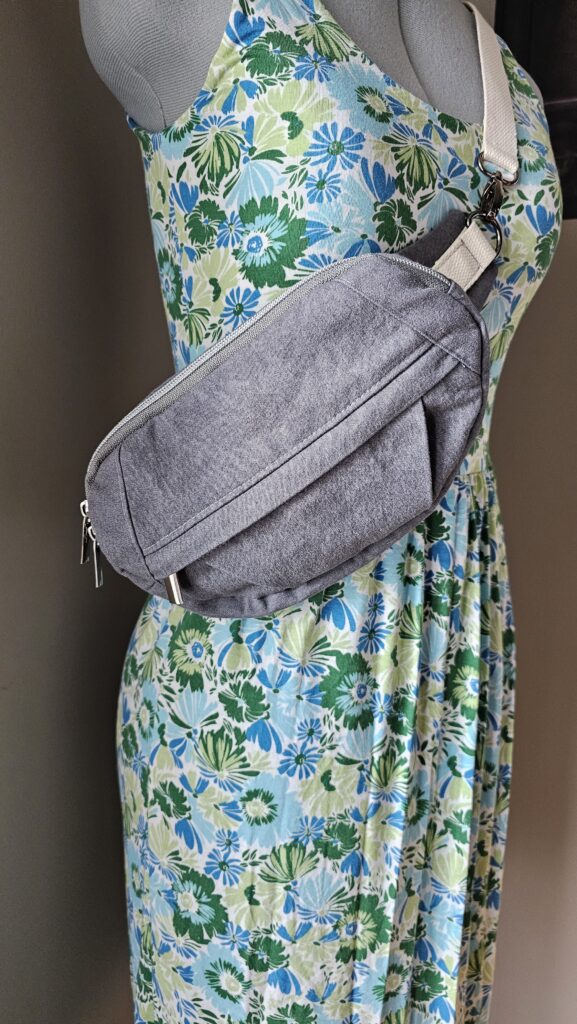
I recently made a bag from The Styled Magnolia and it included a video tutorial. I made the Capparis Belt Bag if you’re curious. I believe that many of their patterns include the video, but be sure to double check on the pattern you are looking at.

Find all The Styled Magnolia Patterns Here
My favorite fun new pair of pants were made using the Love Notions Largo Cargo Pants Pattern. I call these my Flower Power Pants:

While the whole pattern did not include a video. There was a few short video tutorials for the zipper and fly construction as well as for the waistband area. Both were very helpful.
End of Course
Thank you for hanging out with me during PDF Sewing Patterns 102. I hope you learned some useful information.
Do you have something you’d like to know more about in the sewing world? Let me know in the comments!
And Happy Sewing!


Your enthusiasm is contagious!